Wednesday, September 7, 2011

The Oversized Coffin

Last time I was wrapping up the deck construction on the trailer.  Fortunately, a lot has happened since then and I now have something that is finally starting to resemble a camper.  I'll try to cover it all quickly.

A key addition to the camper at this step was the addition of a tongue jack.  Previously, we had been using a log to support the neck of the trailer, but with the addition of a good bit of wood and weight, this was getting to be an unreliable arrangement.  I picked up a cheap, heavy-duty bolt-on boat trailer jack with dual wheels, crank up/down, and pivot to fold out of the way from Harbor Freight.  We decided to mount it on the center yolk support which is a tight fit.  I may decide to move it to the outside rail later, but for now there it stays.
In my last post I mentioned that one more bolt-on was needed to have basic trailer base built.  Since the deck is over-sized to accommodate a larger mattress inside, a PVC spacer is needed on the sides of the trailer to create a flush surface to bolt the walls of the cabin to.  The advantage of PVC is again its durability and rot-free nature.  Since the fenders supports will need to bolt through this trim, holes we drilled prior to mounting.
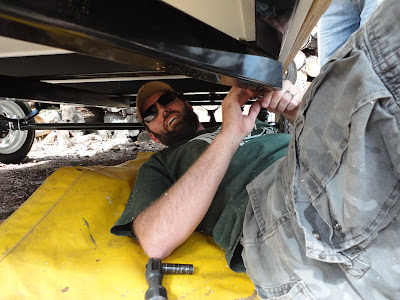
Using the same fastening technique as on the deck, self-tap screws were used to fasten a 3 1/2" piece of PVC trim to each side of the trailer under the deck overhang (look closely in the pic to see the white PVC).
At this point, the trailer was ready for wall construction.  Working from a variety of existing camper designs available online, a number of dimension scenarios were considered using graph paper as an transparent overlay (thanks to my dad for his drafting skills here).
The primary considerations at this step are to finalize the overall height, the radii for the front and rear curves, and placement of the doors in the side.  After considering several options, we arrived at a 53" height that includes 3" overhang over the sides, 2" roof thickness, a 6" thick mattress, and 2" interior drop on the roof fan that will be installed later.  This still allows for me (6'1") to reach over my head to change clothes while sitting on the mattress.  In terms of the radii of the curves, we arrive at a 30" radius on the front, and 54" radius on the back.  This seemed to be a good balance of curves with something that didn't look too egg shaped.  Lastly, the door placement was decided to be as far to the rear as possible without encroaching on the wheels/fenders.  The goal here was to be able to get in/out of the camper by sitting and turning, without having to shimmy forward/backward from a laying position.

With those dimensions in mind, the next step was to create the walls.  The 53" height, combined with 101 1/2" length meant the walls would need to be stretched from three pieces of plywood.  To accomplish this, each piece of plywood was cut to a 53" height.  Based on the positioning of the door, we decide the piece would be unequal with the forward piece of plywood narrow, the middle the widest to accommodate the door opening, and the back piece covering the balance of the length. The plywood was joined at the ends using biscuits and wood glue, with a 1' wide backing of 1/4" plywood fastened with construction cement and air-driven brads.
Having a specialty biscuit hole driller helps!
The 1/4" backing "panels".
After assembling the wall pieces and allowing time for the glue to set up, the next step was to cut the walls to the profile drawn out on the "blueprint".  To accomplish this my dad came up with a great radius cutting tool.  Using a scrap strip of plywood, he measured the the distance of each curve radius from the end of the strip and drilled a hole.  He also then drilled a larger hole at the other end, and bolted his router to this end, allowing for the other end of the board to be loosely screwed to the wall being cut at the center point of the curve's radius.
The radius tool with router installed on one end.
The radius tool making a cut.

A cut made by the router.
With the front and rear radii cut in the sides, the next step was to cut the door opening.  As mentioned, the door opening has been set as far back toward the rear of the trailer as possible to make ingress/egress as easy as possible.  The other locating dimension for the door was to raise the door opening 3" above the deck height to allow for some mattress thickness to extend above the opening and not create an lip to get hung up on when getting in and out of the camper.  Otherwise, the door opening is based on the dimensions of the ARE truck cap walk through door dimensions of 22" x 39" I purchased, which I'll explain in the next post.  

Using a circular saw with a plunge cut for the straight edges and and jigsaw for the rounded corners, the door openings were cut in several passes.  The last part of the wall construction for now was to reinforce the door opening with a 3" trim backing around the inside of the door opening.  This was done using scrap plywood, fastened with brad and construction cement.
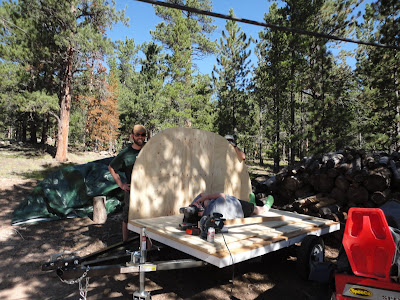
That bring us to the part of the process that provided the title for this post.  In the middle of this build day, Diane shared her fear that sleeping in this camper would be like sleeping in a coffin, due to its small size.  Until now, there wasn't really a frame of reference for how large or small the camper would be.  Based on an initial look at the uncut walls, it looked like the camper would be small, but big enough. When the walls were trimmed down to size, there was somewhat of a shared 'holy crap' reaction at how small the thing might be.  This picture captures Diane's concern!!!
And the coffin pose!!!
Fortunately, the permanent installation of the walls proved to somehow make the camper feel larger than it just had.  Here you can see how much more at ease Diane is about it.  It was at this point that she commented how the camper would be an oversized coffin instead or a regular coffin!
It turned out the wall mounting was relatively straightforward.  I picked up some 5/16" x 2 1/2" machine bolts with taper heads and lock nuts.  We drilled eight holes for each wall, going through the plywood, PVC, and c-channel frame of the trailer, backed with a lock nut and a flat washer.  The lock nuts pull the head of the bolt flush with the plywood surface so that the aluminum skin would have a smooth backing.
Me posing while bolting the walls on.
The last step at this point was to begin joining the walls and creating a roof surface by installing the cross-member (stringers?).  I had considered using 2"x2" pine for this, but my dad pointed that the weakness and likelihood of warping of this wood product.  Instead, he suggested we use glued and nailed strips of plywood, so we did.  Right away I could tell these "boards" had a sturdier feeling to them.  Using another of his handy tools, my dad drilled end-grain fastening holes to tie the cross members to the walls.
We decided on 10" spacing for these.  We got a few installed before we ran out of gas and time.
Speaking of which, I'm about out of both for this post.  Next time I'll get into more detail about the stringers, door installation, roofing, and whatever we decide to do next.  Later...

Monday, August 8, 2011

Beavis, I've Got Wood...

So despite a bit of a lull since my last post, I've managed some good progress on the trailer over the past month.  With the frame modification more or less complete, it was time to move on to the wood framing of the trailer.  Because of the over-sized design of the trailer, a good bit of plywood would be needed.  In total, nine sheets of 4'x8' would  be needed- three sheets of 3/4" exterior grade sheathing for the deck, and a total of five (2 1/2 per side) sheets of 3/4" higher grade interior/exterior grade for the walls.  A shopping trip to Home Depot was in order.
Given the size limitations of the Subaru, my dad agreed to meet me at Home Depot, and we loaded everything into his utility trailer to get it back up the mountain to his house.
Also included in the shopping trip were several pieces of PVC moulding, plastic paneling, and FRP adhesive, which is a fiberglass product designed to adhere plastic paneling to wood.  All of this is explained in detail below.

We decided the starting point for the wood construction would be to assemble the deck.  Based on the planned dimensions of 61" x 102" we needed to piece three sections of plywood together.  Also, we needed to find a way to seal the underside of the plywood since it would be exposed to road spray and other moisture.  In researching a solution, I'd read a variety of techniques such as using roofing tar and wood sealer, pressure treated wood, etc.   Each of these seemed to have some serious limitations.  What we came up with was to use the plastic paneling and FRP.  This way, we would a have a completely moisture proof seal on the underside of the trailer.  The way the FRP works is to trowel it onto the plywood, using the teeth of the trowel to ensure a consistent application.
Once the FRP has been evenly spread, the plastic paneling can be applied, and a roller used to remove air pockets.
In anticipation of needing to mount the plywood deck to the trailer frame, we needed to create a level surface on the frame.  Since the Northern Tool trailer is a bolt together design that has bolt heads protruding up from the top of the frame, we decided to use 1/4" PVC trim as essentially furring strips to spacer the deck up from the frame.  Using some all purpose adhesive, we tack glued the strips to the deck, which had been cut to length to span between the bolt heads.
With the furring strips in place, it was time to mount the deck.  After a false start with some Phillips head hardware we decide on using #12 x 2" self-tapping 5/16" hex head metal screws to mount the plywood deck pieces to the frame.  This would allow us (in theory) to drive a screw directly through the plywood, plastic paneling, 1/4" furring, and 1/8" steel frame in a single self-pilot drive.  In reality, what we found was that the self-tap screws had a hard time getting through the steel, and we needed to pilot drill the hole with a bit.  To ensure a flush mount, we using a forstner bit to drill a recess in the plywood to allow the heads of the screws to be flush with the top surface of the deck.  My dad happened to have a nice depth stop attachment for his drill, allowing precise recess holes to be drilled.
When complete, the driven hardware had a nice, smooth, professional look to it.
This part of the process really took some trial and error to get right.  We managed to break a few drill bits, we chewed off a few self-tap heads, and hit parts of the frame where the steel is doubled-up, which the screws could not get through.  A complication of this task was that you needed to drive the screw with consistent speed until it pierced the steel frame.  If you paused the drill when you got to the steel, the head of the screw would bugger and never make it through the steel.  Even worse, the leftovers of the chewed up screw would prevent you from re-drilling the hole, so you would have to start a new recess hole and pilot hole somewhere nearby.  The other problem with this is that excess holes in the paneling were created, which would need to be sealed with silicone.  The other little trick of this technique we figured out was that, to avoid over-driving the screws, you would need to stop the drill after piercing the steel and crank the torque setting down on the drill.  Sometimes this did not work though, and the screw head would bite too far into the plywood.  Oh well, after a few goofs we got this technique worked out and managed to fasten all the screws.

As mentioned, over-sizing the deck included cutting plywood larger than the steel frame by 3/4" on each side to allow for a larger mattress inside.
To create a flush side, a piece of 3/4" PVC trim will be screwed to the side of the frame underneath the plywood overhang.  The plywood wall will then mount up to and bolt through the PVC trim.  This process will be explained in more detail in the next post.


Since the deck would go on in three pieces, we needed to create a seal between each of the pieces of plywood.  We decided to do this by overcutting the plastic paneling.  Specifically, we left about 1 1/2" of paneling overhang on one side of the front two pieces of plywood.  We could then apply a heavy bead of silicone to the paneling which would overlap with the adjacent piece of plywood.

This proved to work very well.  As one last step to finish this technique, we belt sanded the joint between the two plywood pieces where a slight lip was present due to the overlap of the plastic, to create a flush surface.
One last step was needed and the decking would be complete.  Since plywood that has been sealed on only one side is prone to warping due to uneven moisture absorption, we applied a good coat of Minwax Spar Urethane to seal the top side of the deck.
Of course, during the process of applying the urethane, one of Murphy's Laws kicked in and it began to rain.  Thinking quickly, we moved the trailer and hung a tarp over the power supply to my Dad's shed (don't worry- it was a well-insulated 220 extension cord, not an overhead line) to form a temporary shelter while the trailer dried.
After an overnight of drying the deck was finished.   Next up, assembling the walls.  This should be a difficult part of the project where things should really start to take shape, but more importantly this trailer will start to look like a camper.  Until next time...

Thursday, July 7, 2011

In the Beginning

So my last post described how I came up with the idea to do this project, and mentioned the progress I had already made in purchasing a Northern Tool trailer, assembling it, and performing some modifications to it.   Here's how that happened.

Early on I decided that I would build the teardrop using a utility trailer base, as opposed to custom fabricating a trailer.  This is a commonly used approach, and while the custom made trailers can provide for optimal weight, strength and ground clearance, the utility trailer approach avoids the need to weld (or cost of paying for welding), likely saves on frame construction costs, and gives a solid, tested, DOT-approved platform upon which to build.

So the next question is, which trailer to use?

There are a number of retailers to pick from including Harbor Freight, Tractor Supply, Red Trailer, etc.  Northern Tools happened to have a nice 5' x 8' trailer that seemed to fit the bill, without extras I didn't need.  And the price was right too- so I ordered it.  Turned out it was on back order, so I had to wait a couple of weeks to get it.  Finally, it showed up on a Yellow truck in two boxes that looked like they had been to hell and back, but it seemed no worse for the wear.  I was on my way.


After talking with my Dad, we decided to build the teardrop at his house due to the lack of space at mine and the extra tools he has.  So far, this has proven a great decision as his air tools and and drill press have been immensely helpful.  So after lugging the two boxes up into the mountains in the back of the Subaru (something I anticipate will play like a broken record before it is all said and done), we laid out the parts on a 1950-something airplane wing tarp on his gravel driveway (a separate story I'm can't cover here, but to avoid losing anything small) to see what we had.


After a somewhat time consuming inventory, turned out all parts were there- a minor miracle given the adventure they'd been through, coming all the way from China and all!  Fast forward a bit and after a day's work, we managed to have the basics of the trailer assembled.  We decided to leave the lights off, as we knew they would end up bolting on to the outside of the shell when finished.  Along the way, we found an air ratchet to be a lifesaver with all the nylon lock nuts included in this bolt-together kit.  Having to hand ratchet them would have been a killer.

So what next?

Well right off the bat, we knew some modifications would be needed.  Shooting for a queen size floorspace (60" x 80"), we knew the trailer deck would need to be extended to accommodate that and the cabinet space in the galley.  Doing some research on aluminum, I found a distributor that offers 103" continuous roll, so we could extend the frame to 102" without a problem.  The solution would be to bolt an additional crossbar to the yoke off the front of the deck.  After a measurement mix-up with a local steel supplier in town, I had the tube steel I needed to make the required modifications.


In addition to the extension of the deck, the triangular yoke on this trailer seemed a bit short and weak with a single face bolt fastening it to the c-channel frame on each side.  We decided to extend the yoke an additional 6" inches, and add a center support tube using 2 1/2" square tube.  This added considerable strength to the yoke, and a foot of length to the overall trailer.
 
The last modification we made to the trailer up to this point was to hang an additional piece of 2 1/2" tube with 1/4" wall thickness to the back two crossbars to serve as 2" receiver tube for a future hitch-style bike rack.

That's where it's at now, thanks to the tremendous assistance of the mascot teardrop dog!
The remaining bolt-ons for the frame include leveling jacks like below and a tongue jack, which I'll get to at a later time.  

What's next?  A trip to Home Depot for plywood to build the deck and walls.  Details to follow...

Tuesday, July 5, 2011

Here We Go

Well, here we go.  This is my first attempt at blogging.  It has taken a lot to get me to this point.  I'll stop short of the psychoanalysis and just say that there's a reason I've not done this before- I'm not the most expressive person in the world.

A little history of this effort- I honestly had little or no knowledge of teardrop campers prior to moving to northern Colorado.  When Diane and I arrived, we noticed a number of them and I immediately thought they were cool.  Wanting to enjoy the best of Colorado and the West, I began pressing Diane to get out and see some of it.  Camping would be an obvious way to do that.  Only one hitch (pardon the pun)- Diane is not and has never really been interested in sleeping on the ground in a tent.

Sooo, why not get a camper?  Five minutes of shopping for RVs will tell you how much more they cost than is in our budget.  Also, gas is expensive and we don't have a $40,000 truck to pull something with.  Besides, building my own would be much cheaper, more fun, and would allow me to build exactly what I want. Since I was able to convince my Dad to turn his driveway into trailer storage and donate his tool shop, his vast collection of tools, and most importantly his time to the effort,  I figured hey, this is a no-brainer.


Boy, did that prove to be anything but the case.  After a few hours of searching the internet for plans, how-tos, and other guidance I began to realize there was more about doing this that I didn't know than there was that I did know.  A couple of months and dozens of hours surfing, reading and researching later, I am still finding out how much I don't know.  The good thing is it's proving itself to be a fun adventure, which is exactly why I decided to do this in the first place.  We'll see if I still feel that way a year from now.

That brings up a good question- how long is this going to take?  Well, one answer I guess is 'as long as it takes'.  A little better answer is that I'd like to have it framed by late 2011, with basic construction done by summer 2012, with completion including all accessories done by the end of 2012.  Well see how well this schedule holds up.

A little more about this blog- I am going to try to stay focused on the build, and not wander too much into stories, trivia or opinion.  My goal is to produce a documented record of the build I can share with others and look back upon when I am done.  To learn a little more about the history of teardrops, what I am trying to accomplish, and what goes into building one, take a look at these links:

General teardrop info: http://en.wikipedia.org/wiki/Teardrop_trailer
Benroy history: http://www.outbackteardrop.com/benroy.html
All things teardrop forum: http://www.mikenchell.com/forums/

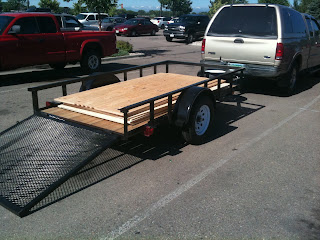
So, at the time of this writing, I've already made what I think is significant progress on the construction, having purchased a Northern Tool trailer, assembling it, and performing some initial modifications.  They following picture shows where it currently stands.  I'll explain how I got this far on my next post, as well as talk about my next steps.  Please feel free to stop back by and check-in on the progress.  Hopefully I'll have some to report.

Mike