
and:


and:

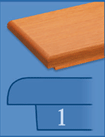
To hang the lower rear cabinet doors, some finish work was required on the cabinet edge. Thinking ahead too, we decided to dry fit the Aquatainer in the lower cabinet space beneath the countertop. If you recall from an earlier post, the goal is to piano hinge the lower cabinet face to enable rear removal of the mattress. Upon taking a measurement, we realized we had left the cabinet too shallow to accommodate to Aquatainer. We are realized that the the front edge of the countertop lacked support and rigidity, so we decided to extend and strengthen the countertop with a piece of walnut trim. Measuring about 3/4" x 1", the walnut was biscuited and glued to the face of the countertop. In profile, a diagram of this arrangement looks like this:


Next up, latches. The latches we selected are a matchbox style, and required a relatively square edge to the cabinet face to allow the latch and the catch faces to butt close enough to each other to allow the latch tongue to engage the catch. Because of the lip style of the cabinets, the catches need to be raised from the face to meet the face of the doors. Using some walnut patches, wood glue, and screws, the mounted latches and catches look like this:

and:

and this:

That's it for now. Next up, cabinet staining, and soon after: electrical, insulation, and doors...
Thanks for more info about how to perfect way to measure cabinet doors.
ReplyDeleteGreat post like this must be highly recommended. It is so nice to read such wonderful blog. Thanks for sharing! Have a pleasant day ahead.
ReplyDeletewholesale exterior door
Cabinet Doors is drawer.shack is small almirah. small almirah is safe to keep goods. Shack is keep storage.
ReplyDeleteThe Cabinet Door Replace is very useful to your home. It is used to put to Goods.
ReplyDeleteThanks for helped to bestow info about Cabinet Door Replacement
The Great job is replace to door or drawer.This is very useful for each person.
ReplyDeleteThanks for this job.
that a great thing to cabinet door replacement and how to manage or repair the cabinet and door.
ReplyDeleteThanks for info to repairing.
Thanks Again once more
Gate locks and latches
ReplyDeleteGate latch hardware
Hinges and latches
Download over 16,000 WOODWORKING Plans at here
ReplyDeletehttp://woodworkingplanspro.weebly.com
Woodworking guide offers anyone of any skill level the ability to build amazing projects. The guide is extra helpful because it offers more detailed explanations, videos and blueprints then your typical woodworker magazine.
Hope it will help you next time !